Don’t Get Lost in the Woods
Welcome back to the Art of Manliness Land Navigation Manual. In Part I, we covered how to properly use a compass, how to shoot your bearings, and the best map for navigating: the topo map. Before we can start actually navigating, which we’ll get to in Part III of this series, we still need to learn where we are in relation to our map — how to orient ourselves. So in this installment, we’ll go over the skills you need to do just that.
Adjusting Your Compass For Declination
Remember declination from Part I? Now that we’re putting compass to map, we need to adjust for it so that we can accurately orient and navigate.
Before we do that, let’s dig a bit deeper into declination. It will make it easier to understand why we adjust for declination in the first place.
As mentioned in Part I, true north and magnetic north aren’t the same. True north is at the very top of the earth, while magnetic north is currently off the coast of Greenland. The angle between true north and magnetic north is declination. But here’s where things get tricky: the angle of declination changes depending where you are on the earth.
Look at this map below:
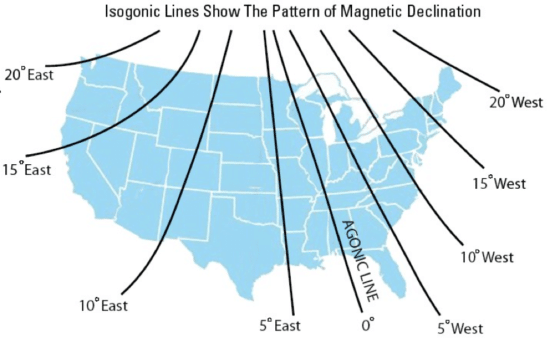
See the line labeled the “agonic line”? When you’re on this line and are facing true north, magnetic north lines up perfectly, too. No declination exists and you don’t have to adjust your compass.
But let’s say you’re in the Muir Woods near San Francisco and you’re facing true north. Magnetic north would be slightly to your right, or east, by about 14°. If you point your compass towards true north, your compass needle is going to point a little to the east. Its declination would be written as 14E.
The post Don’t Get Lost in the Woods appeared first on LewRockwell.
Leave a Reply